Category Archives: Uncategorized

Apple Breaks FTP

I have been using an Apple Airport Extreme (Generation 5) for about a year. Gotta say, it is one of the most stable WIFI routers I have ever used.

I recently noticed there was a firmware upgrade when logging into the admin interface. Great lets update!

A day or two later I can’t use FTP. What’s going on, is my ISP blocking FTP? That would be crazy, as FTP is still (despite security issues) the primary method to publish websites. I suspected it could be the router, but I don’t have any outbound rules or limits in place…

A couple of Google searches and sure enough. The latest firmware in AirPort Extreme and AirPort Time Capsule have broken FTP implementations.

All is not lost. You can easily downgrade back to firmware 7.6.1 to get your FTP functioning again. If you are running Gen. 6 of the AirPort Extreme you can’t roll your firmware back that far, consider returning it to Apple

Windows 2008 NLB No Reply Off Local Subnet

I have been running Windows NLB for many years under Windows 2003. The setup has always been Unicast with two NIC’s in each server. The setup has worked well for load balancing both websites and email servers.

Since it is already 2013 I thought it was time to upgrade to Windows 2008 server.

The setup for NLB was exactly the same, same server hardware and network environment.

Imagine my surprise (anger is more like it) when the NLB no longer worked. I search for a couple of days and found a few links that got me set straight.

In Windows 2003 using IPv4 the networking operates in weakhost mode. It has to do with if a server will send/receive traffic if it is received at a NIC that does not have the IP address bound to it.

In Windows 2008 they have changed it to increase the security and use stronghost mode. If a NIC receives traffic for an IP that is not bound to the NIC it is ignored.

I found a small comment on this VMWare page that addressed the issue, and a very long winded page about NLB here.

The bottom line is you can’t pass traffic as Windows 2008 comes out of the box, so NLB will not work. Thanks Microsoft!

I understand the risk which is someone could route traffic to a server via the Internet and get it to pass over the server into another network. This does not apply in my case as the servers are only public Internet facing.

There are a few ways to fix it, but for me the easiest was to enable weak mode again. To do this you can execute a couple of commands using netsh against the Local Area Connection NIC and things will start working again.

netsh interface ipv4 set interface "Local Area Connection" weakhostreceive=enable
netsh interface ipv4 set interface "Local Area Connection" weakhostsend=enable

You can verify the NIC status both before and after you have run the command to see if the change was made:

netsh interface ipv4 show interface "Local Area Connection"

Dynamic IP Addresses / Security

Normally my work involves offices with fixed IP addresses. Recently I have been working with an office that has a dynamic IP address that can change. It does not change often, but anytime the router restarts it may come back online with a new address.

That is really a pain if you have security that is managed by IP address. Without a site to site VPN to process traffic you can find yourself updating firewall rules often; which is not much fun.

I found that both pfSense and csf can accept FQDN (fully qualified domain names) for granting permissions through the firewalls. So if you have a dynamic IP address, but use a dynamic name resolution service you can grant permissions that will follow your IP address changes.

Hopefully you find a use for this, it really has made my life much easier.

Setup simpleSAMLphp / WordPress in a hosted environment

The following is a rough guide, use your brain and don’t copy the paths exactly as they are. They will be different in your environment.

Download SimpleSAMLPhp

As of version 1.11.0 you require PHP 5.3 (despite the docs saying you need only 5.2)

Extract contents to a simplesamlphp folder on server that exists OUTSIDE your website path, for security you can’t have all the files accessible via web.

Move the www folder from simpleSAMLphp into the web path of your site, rename folder from www to saml.

Next you need to make adjustments to support running simpleSAMLphp in a hosted environment. I found the guide here but did not follow it exactly. Here are the steps I performed:

Changes to _include.php

Make a couple of configuration changes to saml/_include.php

Change the line from:

require_once(dirname(dirname(__FILE__)) . '/lib/_autoload.php');

to something like:

require_once('/home/43789/domains/widget.com/simplesamlphp/lib/_autoload.php');

At the the end of the _include.php file, you need to change another line from:

$configdir = dirname(dirname(__FILE__)) . '/config';

to something like:

$configdir = dirname('/home/43789/domains/widget.com/simplesamlphp/config/config.php');

Changes to config.php

Next we move to edits in simplesamlphp/config/config.php

Change the baseurlpath (which is the mapping to the saml path in your web root)

'baseurlpath' => 'simplesaml/',

change to:

'baseurlpath' => 'saml/',

Define your own admin password (in simplesamlphp/config/config.php)

'auth.adminpassword' => 'putsomthinghere',

Define your own secret salt (in simplesamlphp/config/config.php)

'secretsalt' => 'put in your own values, longer and more complex the better',

Define your timezone of the server (in simplesamlphp/config/config.php). You can get a list of valid timezones here: http://php.net/manual/en/timezones.php

'timezone' => 'America/New_York',

Are we done yet??? Nope, keep reading.

Define Authentiation Source

You need to tell simpleSAMLphp where you will be authenticating against. In my setup I am authenticating against a remote SAML server. Specifically I defined the idp and entityID in simplesamlphp/config/authsources.php, as follows:

'authprovider.com' => array(
   'saml:SP',
   'idp' => 'https://authprovider.com/saml/',

   // The entity ID of this SP.
   // Can be NULL/unset, in which case an entity ID is generated based on the metadata URL.
   'entityID' =>'widget.com',

   // The URL to the discovery service.
   // Can be NULL/unset, in which case a builtin discovery service will be used.
   'discoURL' => NULL,
),

The first authprovider.com is the name you are giving to the authentication source, idp is the actual URL you will send visitors to get authentication. entityID is your site.

Install Public Cert

We need to install the public certificate from your Identity Provider (IdP). The file is probably named something.crt so grab that and place it in the following path:

simplesamlphp/cert/something.crt

Define IdP Metadata

This will vary based on your setup, but since I am authenticating against a remote SAML 2.0 authentication provider I need to define the setup in simplesamlphp/metadata/saml20-idp-remote.php. I added the following to match the values added in authsources.php

$metadata['https://authprovider.com/saml/'] = array(
  'name' => 'authprovider.com',
  'description' => array(
	'en' => 'Authenticate against authprovider.com.',
  ),
  'SingleSignOnService' => 'https://authprovider.com/saml/',
  'certFingerprint' => '062B6983E437432A9D63BAA23BB146C55996F07F',
  'certificate' => 'something.crt'
);

Getting the fingerprint of the .crt file can be a bit tricky. You can use openSSL to read it but ideally the cert provider will be able to give it to you.

Finally – Lets Test

With those changes made you should be able to get some type of reply out of simpleSAMLphp at the following URL on your website: http://widget.com/saml/

If you are able to authenticate with simpleSAMLphp’s testing tool then you are ready to configure wordpress.

Configuring WordPress
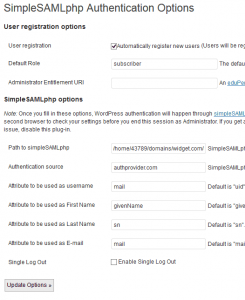
Authentication OptionsThere are a few different SAML plugins available for WordPress, some have no documentation – some have a little. I ended up going with simpleSAMLphp Authentication (website is down often). Install was easy using the plugin installer built into WordPress.

Specify the path to simpleSAMLphp, that is the install folder that is located outside your www path (you did put it outside the www path right?). In my example the path is:

/home/43789/domains/widget.com/simplesamlphp

Authentication source:

authprovider.com

Just those two values should be enough, the first tells wordpress where to find simpleSAMLphp and the second is the name of the authentication provider you are going to be using.

If you supply a default role and automatically register new users, then anyone who clicks to authenticate will automatically have an account in WordPress created for them if they successfully authenticate.

mysql – do not replicate command(s)

Under normal conditions when you setup replication between servers you want everything to flow: database a -> database b

In order for both databases to be in sync. all changes to database a must be replicated.

If you encounter a situation where you want to make a change, but do not want the commands to replicate you can disable bin logging:

set sql_log_bin = {0|1}

With the bin_log shut off, you can do any changes you need and they will not replicate.

The change applies to the current session only and will not impact your entire server.

Moving large files? Try split first.

I often need to move large files between servers, usually between different data centers. If I have a 100 gig file that I need to move (SQL backups for example) it can take a VERY long time to try and transfer the data via FTP (RSYNC is not an option in this example).

I find that moving a file via FTP might transfer at 250k per second. But it is possible to transfer multiple files via FTP at the same time, all at 250k per second (seems strange right?).

To increase the speed of the transfer use the split command on unix to split the 100 gig file into pieces, transfer the pieces to the destination and then rebuild the pieces into the original file. Here is an example:

split -–bytes=500m database.sql.gz database_

This will split a large file into 500 meg pieces. The file being processed is database.sql.gz and it will result in pieces like database_aa, database_ab … etc.

Then using FTP, transfer the collection of files and have the process completed much faster vs. transferring a single large file.

Once you have all the files moved to the destination, you need to take all the pieces and put them back together. To do this, use cat.

cat database_* > database.sql.gz

If you are looking to combine the files back into one under Windows, from the command prompt try something like this:

copy /b database_* database.sql.gz

That’s it, I now have my original file restored and ready for processing.