Author Archives: wagamama

Setup simpleSAMLphp / WordPress in a hosted environment

The following is a rough guide, use your brain and don’t copy the paths exactly as they are. They will be different in your environment.

Download SimpleSAMLPhp

As of version 1.11.0 you require PHP 5.3 (despite the docs saying you need only 5.2)

Extract contents to a simplesamlphp folder on server that exists OUTSIDE your website path, for security you can’t have all the files accessible via web.

Move the www folder from simpleSAMLphp into the web path of your site, rename folder from www to saml.

Next you need to make adjustments to support running simpleSAMLphp in a hosted environment. I found the guide here but did not follow it exactly. Here are the steps I performed:

Changes to _include.php

Make a couple of configuration changes to saml/_include.php

Change the line from:

require_once(dirname(dirname(__FILE__)) . '/lib/_autoload.php');

to something like:

require_once('/home/43789/domains/widget.com/simplesamlphp/lib/_autoload.php');

At the the end of the _include.php file, you need to change another line from:

$configdir = dirname(dirname(__FILE__)) . '/config';

to something like:

$configdir = dirname('/home/43789/domains/widget.com/simplesamlphp/config/config.php');

Changes to config.php

Next we move to edits in simplesamlphp/config/config.php

Change the baseurlpath (which is the mapping to the saml path in your web root)

'baseurlpath' => 'simplesaml/',

change to:

'baseurlpath' => 'saml/',

Define your own admin password (in simplesamlphp/config/config.php)

'auth.adminpassword' => 'putsomthinghere',

Define your own secret salt (in simplesamlphp/config/config.php)

'secretsalt' => 'put in your own values, longer and more complex the better',

Define your timezone of the server (in simplesamlphp/config/config.php). You can get a list of valid timezones here: http://php.net/manual/en/timezones.php

'timezone' => 'America/New_York',

Are we done yet??? Nope, keep reading.

Define Authentiation Source

You need to tell simpleSAMLphp where you will be authenticating against. In my setup I am authenticating against a remote SAML server. Specifically I defined the idp and entityID in simplesamlphp/config/authsources.php, as follows:

'authprovider.com' => array(
   'saml:SP',
   'idp' => 'https://authprovider.com/saml/',

   // The entity ID of this SP.
   // Can be NULL/unset, in which case an entity ID is generated based on the metadata URL.
   'entityID' =>'widget.com',

   // The URL to the discovery service.
   // Can be NULL/unset, in which case a builtin discovery service will be used.
   'discoURL' => NULL,
),

The first authprovider.com is the name you are giving to the authentication source, idp is the actual URL you will send visitors to get authentication. entityID is your site.

Install Public Cert

We need to install the public certificate from your Identity Provider (IdP). The file is probably named something.crt so grab that and place it in the following path:

simplesamlphp/cert/something.crt

Define IdP Metadata

This will vary based on your setup, but since I am authenticating against a remote SAML 2.0 authentication provider I need to define the setup in simplesamlphp/metadata/saml20-idp-remote.php. I added the following to match the values added in authsources.php

$metadata['https://authprovider.com/saml/'] = array(
  'name' => 'authprovider.com',
  'description' => array(
	'en' => 'Authenticate against authprovider.com.',
  ),
  'SingleSignOnService' => 'https://authprovider.com/saml/',
  'certFingerprint' => '062B6983E437432A9D63BAA23BB146C55996F07F',
  'certificate' => 'something.crt'
);

Getting the fingerprint of the .crt file can be a bit tricky. You can use openSSL to read it but ideally the cert provider will be able to give it to you.

Finally – Lets Test

With those changes made you should be able to get some type of reply out of simpleSAMLphp at the following URL on your website: http://widget.com/saml/

If you are able to authenticate with simpleSAMLphp’s testing tool then you are ready to configure wordpress.

Configuring WordPress

Authentication Options
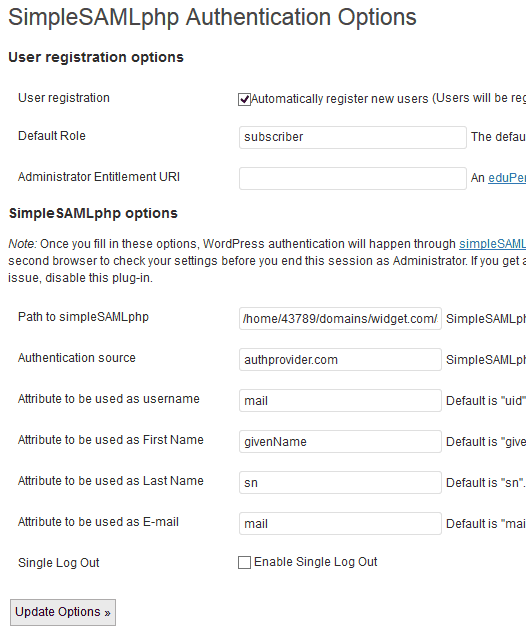
There are a few different SAML plugins available for WordPress, some have no documentation – some have a little. I ended up going with simpleSAMLphp Authentication (website is down often). Install was easy using the plugin installer built into WordPress.

Specify the path to simpleSAMLphp, that is the install folder that is located outside your www path (you did put it outside the www path right?). In my example the path is:

/home/43789/domains/widget.com/simplesamlphp

Authentication source:

authprovider.com

Just those two values should be enough, the first tells wordpress where to find simpleSAMLphp and the second is the name of the authentication provider you are going to be using.

If you supply a default role and automatically register new users, then anyone who clicks to authenticate will automatically have an account in WordPress created for them if they successfully authenticate.

mysql – do not replicate command(s)

Under normal conditions when you setup replication between servers you want everything to flow: database a -> database b

In order for both databases to be in sync. all changes to database a must be replicated.

If you encounter a situation where you want to make a change, but do not want the commands to replicate you can disable bin logging:

set sql_log_bin = {0|1}

With the bin_log shut off, you can do any changes you need and they will not replicate.

The change applies to the current session only and will not impact your entire server.

DirectAdmin – Missing PHP LDAP

If you have found yourself needing to access an LDAP server from PHP and your running on a DirectAdmin box you’re going to find it is not available by default.

Here is what I needed to do in order to get it running on a Debian system:

apt-get install php5-ldap libldap-dev

Copy the ldap.so file into the PHP extensions directory:

cp /usr/lib/php5/20090626/ldap.so /usr/local/lib/php/extensions/no-debug-non-zts-20090626/

Add the extension to your active php.ini file, in my case the active php.ini file was: /usr/local/lib/php.ini. You can find out the location of your working php.ini file through phpinfo().

extension=ldap.so

Restart Apache and you should be up and running (you can use phpinfo() to check if LDAP is available to you.

/etc/init.d/httpd restart

Moving large files? Try split first.

I often need to move large files between servers, usually between different data centers. If I have a 100 gig file that I need to move (SQL backups for example) it can take a VERY long time to try and transfer the data via FTP (RSYNC is not an option in this example).

I find that moving a file via FTP might transfer at 250k per second. But it is possible to transfer multiple files via FTP at the same time, all at 250k per second (seems strange right?).

To increase the speed of the transfer use the split command on unix to split the 100 gig file into pieces, transfer the pieces to the destination and then rebuild the pieces into the original file. Here is an example:

split -–bytes=500m database.sql.gz database_

This will split a large file into 500 meg pieces. The file being processed is database.sql.gz and it will result in pieces like database_aa, database_ab … etc.

Then using FTP, transfer the collection of files and have the process completed much faster vs. transferring a single large file.

Once you have all the files moved to the destination, you need to take all the pieces and put them back together. To do this, use cat.

cat database_* > database.sql.gz

If you are looking to combine the files back into one under Windows, from the command prompt try something like this:

copy /b database_* database.sql.gz

That’s it, I now have my original file restored and ready for processing.

DirectAdmin – Root Email Messages

When you setup DirectAdmin, notification messages are by default sent to root@host.server.com.  For most people this would not be practical.

To easily modify where all messages to root are sent, the easiest is to create a .forward file for the root user.

Execute the following command and messages to root@host.server.com will automatically be forwarded to your actual email address and hey, you might actually get them that way.

echo "your@email.com" > /root/.forward

In addition to that, you need to ensure the permissions are correct on the .forward file. If you are running Exim, it is really picky about the security level on the files by default.

I found this works:

chmod 0600 .forward

Compiling DNSDB into Exim on Debian/Directadmin

Directadmin by default uses Exim, however the DNSDB lookup module is not available. DNSDB allows Exim to perform DNS lookups as part of mail processing. I am using it to lookup SPF records of incoming mail.

Currently there is no way to add it, or enable it – not even using custombuild.  If you want it you must compile Exim from source.  Here is the procedure I used on a Debian box to get it activated.

First, ensure you have the dependencies for exim.

apt-get install libdb4.8-dev libperl-dev libsasl2-dev

Change all occurrences of 4.80.1 to the version you want to use.

wget http://files.directadmin.com/services/custombuild/exim-4.80.1.tar.gz
tar xvzf exim-4.80.1.tar.gz
cd exim-4.80.1/Local
wget http://www.directadmin.com/Makefile
perl -pi -e 's/^EXTRALIBS/#EXTRALIBS/' Makefile
perl -pi -e 's/HAVE_ICONV=yes/HAVE_ICONV=no/' Makefile
perl -pi -e 's/^#LOOKUP_DNSDB=yes/LOOKUP_DNSDB=yes/' Makefile
cd ..
make
make install

The above commands will download the unmodified source for exim, extract it, download a makefile from the directadmin servers, use a perl command to adjust the makefile, compile and install the fresh exim build.

The file that is created is /usr/sbin/exim-4.80.1-1, so we must change the name and overwrite the existing exim file.

/etc/init.d/exim stop
cp -f /usr/sbin/exim-4.80.1-1 /usr/sbin/exim
chmod 4755 /usr/sbin/exim
/etc/init.d/exim start

To verify you have a working Exim with DNSDB compiled in do the following:

exim -bV

You should get an output from Exim, look for the line that lists the built-in lookups and confirm that dnsdb is listed (as seen in the image below).

dnsdb

Is Amazon EC2 Really What You Need?

Amazon AWS LogoI like the concept of Amazon EC2, which allows you to rent computing power by the hour. Amazon AWSTheir entry level spec is called ‘small’, and costs $0.12 per hour for a Windows server based instance at their cheapest data center in Virginia USA, it provides you with the following:

    1.7 GB memory
    1 EC2 Compute Unit (1 virtual core with 1 EC2 Compute Unit)
    160 GB instance storage

Ok, everyone knows what 1.7GB of memory is, and 160GB of disk space. But what is an EC2 Compute Unit?

They describe that as “equivalent CPU capacity of a 1.0-1.2 GHz 2007 Opteron or 2007 Xeon processor”, which unfortunately does not help much.

I set out to find out exactly how much power that is, by using PassMark’s PerformanceTest 7.0. By running that on a few machines I had access to, and Amazon’s small EC2 I could get an idea how much processing power you can get for $0.12 per hour (about $87 per month). Here are the results:

Core i7 920 @ 2.667Ghz – Passmark Score 5,706
Intel Dual-Core E5200 @ 2.50GHz – Passmark Score 1,574
Intel Pentium Dual E2180 @ 2.00GHz – Passmark Score 1,270
Intel Atom D510 @ 1.66GHz – Passmark Score 663
Amazon Small @ 1 Ec2 – Passmark Score 343

These scores are based on PassMark’s CPU test only, and were not designed to test all aspects of the computer. With so much variation between disks, network and video performance I was really only interested in the raw CPU power.

The results were disappointing to say the least. You can purchase an entire computer based on Intel’s Atom processor for $300 – $400 on the market right now (no monitor or keyboard). That much financial outlay will get you a machine with nearly twice the CPU power of Amazon’s small EC2.

It would take you nearly 17 of these Amazon small EC2 computers to provide you with the same level of CPU power of a single i7 920 processor. So, if you want the i7 computing power on Amazon’s cloud it would cost you $1,468.80 per month. With numbers like that you really need to do your homework, if you require something that is CPU intensive for long periods vs. burst usage for only a few hours you may be better off buying than renting.