The following is a rough guide, use your brain and don’t copy the paths exactly as they are. They will be different in your environment.
Download SimpleSAMLPhp
As of version 1.11.0 you require PHP 5.3 (despite the docs saying you need only 5.2)
Extract contents to a simplesamlphp folder on server that exists OUTSIDE your website path, for security you can’t have all the files accessible via web.
Move the www folder from simpleSAMLphp into the web path of your site, rename folder from www to saml.
Next you need to make adjustments to support running simpleSAMLphp in a hosted environment. I found the guide here but did not follow it exactly. Here are the steps I performed:
Changes to _include.php
Make a couple of configuration changes to saml/_include.php
Change the line from:
require_once(dirname(dirname(__FILE__)) . '/lib/_autoload.php');
to something like:
require_once('/home/43789/domains/widget.com/simplesamlphp/lib/_autoload.php');
At the the end of the _include.php file, you need to change another line from:
$configdir = dirname(dirname(__FILE__)) . '/config';
to something like:
$configdir = dirname('/home/43789/domains/widget.com/simplesamlphp/config/config.php');
Changes to config.php
Next we move to edits in simplesamlphp/config/config.php
Change the baseurlpath (which is the mapping to the saml path in your web root)
'baseurlpath' => 'simplesaml/',
change to:
'baseurlpath' => 'saml/',
Define your own admin password (in simplesamlphp/config/config.php)
'auth.adminpassword' => 'putsomthinghere',
Define your own secret salt (in simplesamlphp/config/config.php)
'secretsalt' => 'put in your own values, longer and more complex the better',
Define your timezone of the server (in simplesamlphp/config/config.php). You can get a list of valid timezones here: http://php.net/manual/en/timezones.php
'timezone' => 'America/New_York',
Are we done yet??? Nope, keep reading.
Define Authentiation Source
You need to tell simpleSAMLphp where you will be authenticating against. In my setup I am authenticating against a remote SAML server. Specifically I defined the idp and entityID in simplesamlphp/config/authsources.php, as follows:
'authprovider.com' => array(
   'saml:SP',
   'idp' => 'https://authprovider.com/saml/',

   // The entity ID of this SP.
   // Can be NULL/unset, in which case an entity ID is generated based on the metadata URL.
   'entityID' =>'widget.com',

   // The URL to the discovery service.
   // Can be NULL/unset, in which case a builtin discovery service will be used.
   'discoURL' => NULL,
),
The first authprovider.com is the name you are giving to the authentication source, idp is the actual URL you will send visitors to get authentication. entityID is your site.
Install Public Cert
We need to install the public certificate from your Identity Provider (IdP). The file is probably named something.crt so grab that and place it in the following path:
simplesamlphp/cert/something.crt
Define IdP Metadata
This will vary based on your setup, but since I am authenticating against a remote SAML 2.0 authentication provider I need to define the setup in simplesamlphp/metadata/saml20-idp-remote.php. I added the following to match the values added in authsources.php
$metadata['https://authprovider.com/saml/'] = array(
  'name' => 'authprovider.com',
  'description' => array(
	'en' => 'Authenticate against authprovider.com.',
  ),
  'SingleSignOnService' => 'https://authprovider.com/saml/',
  'certFingerprint' => '062B6983E437432A9D63BAA23BB146C55996F07F',
  'certificate' => 'something.crt'
);
Getting the fingerprint of the .crt file can be a bit tricky. You can use openSSL to read it but ideally the cert provider will be able to give it to you.
Finally – Lets Test
With those changes made you should be able to get some type of reply out of simpleSAMLphp at the following URL on your website: http://widget.com/saml/
If you are able to authenticate with simpleSAMLphp’s testing tool then you are ready to configure wordpress.
Configuring WordPress
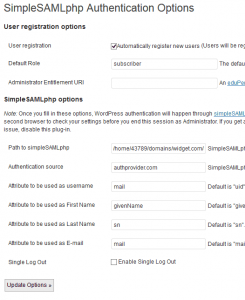
 There are a few different SAML plugins available for WordPress, some have no documentation – some have a little. I ended up going with simpleSAMLphp Authentication (website is down often). Install was easy using the plugin installer built into WordPress.
Specify the path to simpleSAMLphp, that is the install folder that is located outside your www path (you did put it outside the www path right?). In my example the path is:
/home/43789/domains/widget.com/simplesamlphp
Authentication source:
authprovider.com
Just those two values should be enough, the first tells wordpress where to find simpleSAMLphp and the second is the name of the authentication provider you are going to be using.
If you supply a default role and automatically register new users, then anyone who clicks to authenticate will automatically have an account in WordPress created for them if they successfully authenticate.

